
 Stick 800 mm RC Trainer Plane STL File
Introduction ✈️
Soar Stick is a fully 3D printable electric soaring glider designed to make real glider flying accessible anywhere in the world. The focus of the platform is simple, reliable production, predictable setup, and calm, efficient flight characteristics. It is built to support both minimal setups for relaxed soaring and more advanced configurations for pilots who want to explore thermals, slope soaring, flaps, and FPV at their own pace.
Soar Stick was developed with real-world constraints in mind. It avoids exotic materials and complicated construction methods, relying instead on smart geometry, optimized structure, and carefully tested proportions. The result is a glider that is easy to build, easy to maintain, and capable of delivering genuine soaring performance.
General Specifications 📐
Soar Stick’s geometry and targets are defined to keep the aircraft lightweight, efficient, and forgiving in flight. The model has a 720 mm fuselage length and a 1200 mm wingspan, creating a long, efficient wing optimized for slow flight and thermal performance.
The target print weight is 326 g, while the typical ready-to-fly weight is around 490 g, resulting in a wing loading of approximately 35 g per dm². This low wing loading allows smooth launches, slow approach speeds, and confident landings. The airfoil selection supports stable lift generation across a wide speed range, making the aircraft suitable for both calm soaring and slope conditions.
The minimum recommended printer build volume is 180 × 180 × 180 mm, and the entire airframe is designed to be printed using standard PLA.
Radio and Flight Setup Overview 🎮
Before the first flight, Soar Stick is intended to be set up with a clean and safe baseline. The platform supports both simple configurations and more advanced soaring setups, depending on the pilot’s experience and goals.
A minimal setup using aileron, elevator, and rudder delivers calm, predictable handling that is ideal for relaxed flying. As experience grows, the aircraft naturally transitions into a learning platform where flap usage, mixes, and fine control tuning become part of the experience.
Center of Gravity ⚖️
Correct center of gravity is critical for safe and efficient flight. The balance point should always be checked with the final battery and electronics installed. Even small changes in component placement can noticeably affect the glider’s behavior, especially during slow flight and thermal turns.
Taking the time to confirm CG before flying ensures predictable pitch response, stable glide performance, and safer landings.
Servo Geometry and Control Linkage
Servo arm geometry plays an important role in control feel and resolution. Using the second hole on the servo arm for ailerons, flaps, elevator, and rudder provides a balanced starting point between precision and available travel.
Before installing pushrods, servos should always be electronically centered using the radio or a servo tester. Control surfaces should be taped in the neutral position before final linkage installation to ensure symmetry and proper alignment.
Basic Flight Setup 🧭
For a reliable starting point, a moderate expo value around 35 percent combined with approximately 75 percent overall rates creates a smooth and forgiving response. This setup softens control input around center while keeping enough authority for normal maneuvering and corrections.
This baseline is ideal for first flights and relaxed soaring sessions.
Advanced Setup, Ailerons
For pilots looking for refined control, Soar Stick benefits from properly tuned aileron differential. Typical values place upward aileron travel between 12 and 14 degrees, with downward travel between 8 and 10 degrees.
A differential ratio in the range of 1.6 to 2.0 to 1 helps reduce adverse yaw, improving coordination and efficiency during turns. This setup becomes especially noticeable during slow, banked thermal circling.
Advanced Setup, Flaps 🌬️
Soar Stick is designed as a true flap-capable glider. Different flap positions allow the aircraft to adapt to changing conditions and flying styles.
A neutral flap position is used for cruise. A slight positive camber improves lift during thermal flight. A small reflex setting reduces drag at higher speeds. For landing, large flap deflection significantly increases drag, enabling steep and controlled approaches without excessive airspeed.
These modes transform Soar Stick from a simple glider into a versatile soaring platform.
Elevator and Rudder Setup
Recommended elevator and rudder travel ranges fall between 20 and 25 degrees, providing enough authority without making the aircraft feel overly sensitive. This balance supports smooth corrections, coordinated turns, and stable slow-speed handling.
Electronics Layout and Internal Space 🔧
The fuselage design includes dedicated internal volumes that simplify electronics installation. Battery placement remains straightforward, while optional space is available for flight controllers, GPS modules, and additional electronics when advanced setups are desired.
This internal organization keeps installations clean, repeatable, and easy to service.
Assembly Philosophy 🛠️
The entire assembly process follows a clear principle: do not rush. Special care is required during hinge installation. Excess adhesive inside hinge slots can lock control surfaces, leading to servo strain or failure.
After every hinge installation step, control surfaces should be moved by hand to confirm free and smooth movement before continuing.
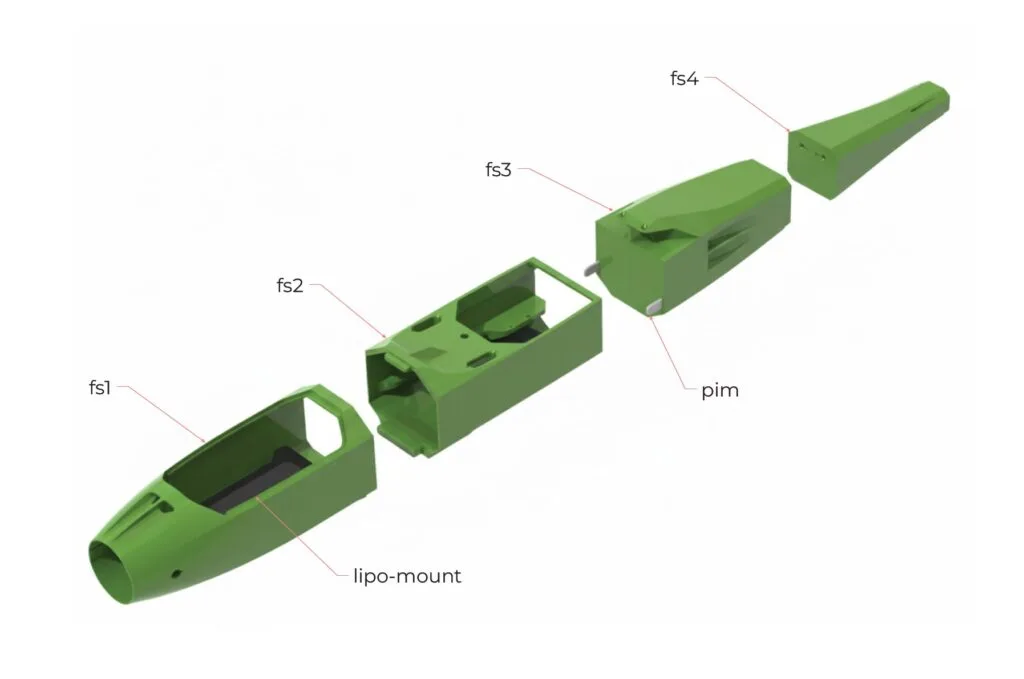
Fuselage Assembly
Fuselage sections are glued together sequentially. Any leftover print artifacts should be removed before bonding. Adhesive is applied along the joint, excess is wiped away, and activator is applied lightly. Proper alignment during this stage ensures a straight, strong airframe.
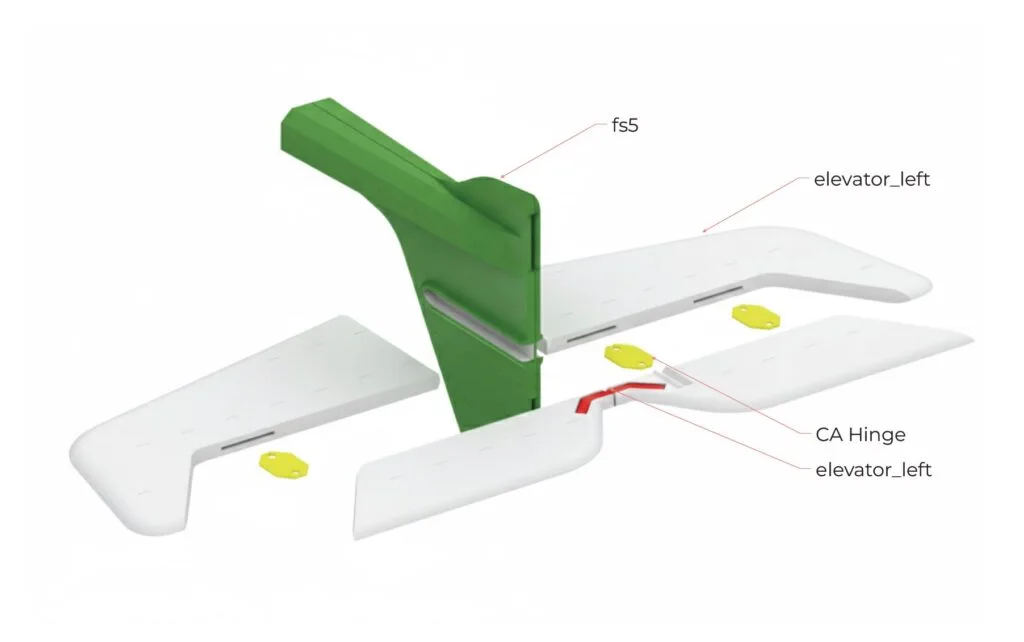
Tail Assembly and Control Surfaces
Elevator and rudder components are assembled with careful alignment. Hinges are glued sparingly, avoiding overflow into moving areas. The tail wheel assembly uses simple hardware and benefits from light lubrication to ensure smooth operation over time.
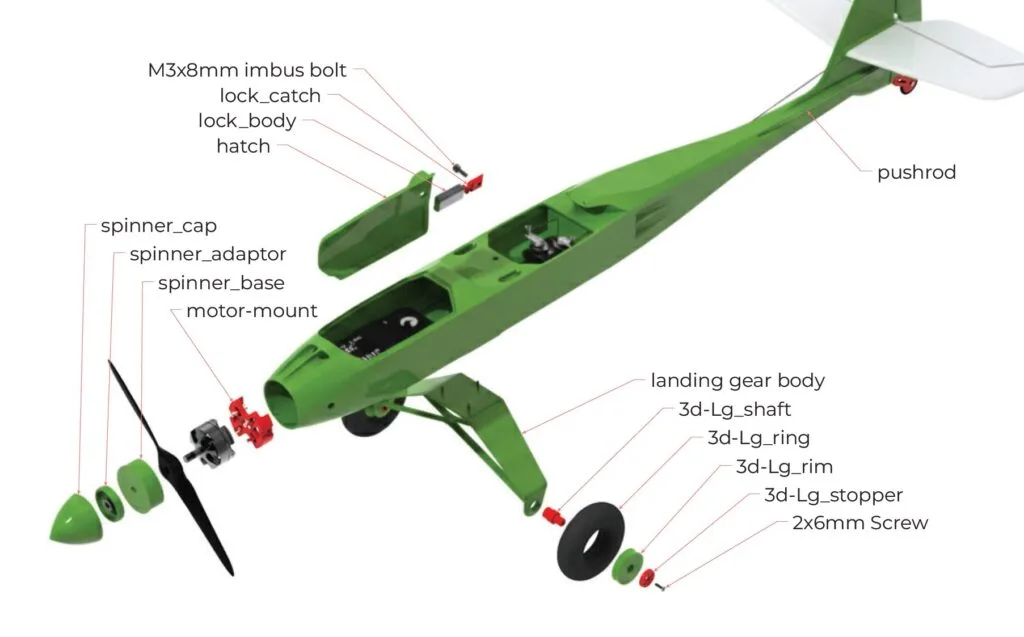
Electronics, Landing Gear, and Power System
Servos and pushrods are installed once control surfaces are confirmed to move freely. The optional landing gear can be installed using the provided mounting points, while a sled-based configuration remains available for pilots who prefer hand launches and belly landings.
Motor, spinner, and propeller components are assembled carefully to ensure proper alignment and vibration-free operation.
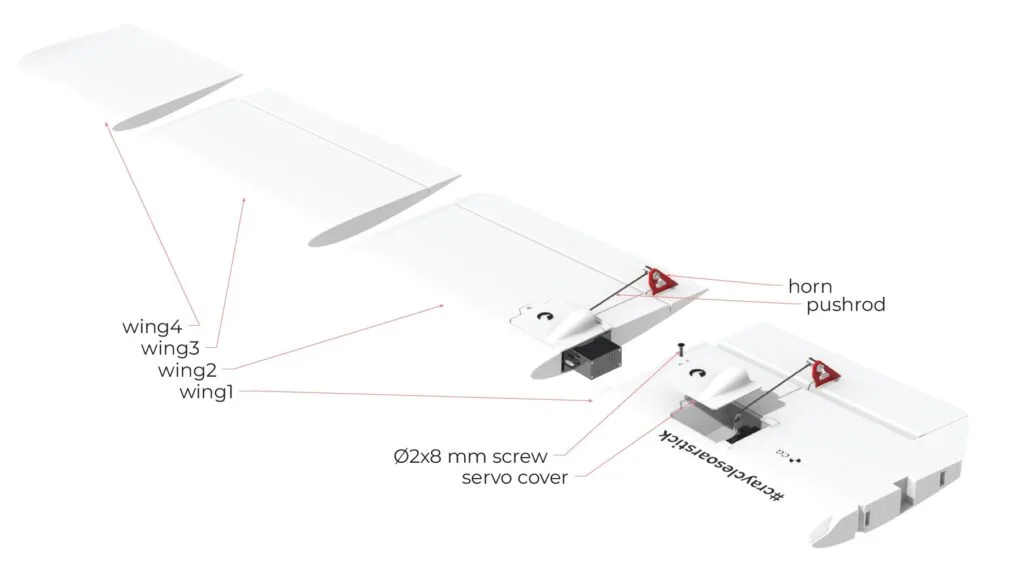
Wing Assembly and Control Setup 🪽
Wing sections are bonded in order and allowed to fully cure before further work. Control surfaces are detached cleanly from their connection points. If flaps are not used, only the ailerons are separated.
Hinges are installed slowly, using minimal adhesive. A practical technique is to glue only one side of a TPU hinge, leaving the opposite side clean for smoother movement.
Before pushrods are installed, servos are centered and control surfaces are taped at neutral.

Wing Joining and Mounting
Wing halves are joined using dedicated support parts and reinforced along the joint line. Adding tape along critical load areas improves durability and longevity.
The wing is secured to the fuselage with a main bolt system that allows quick removal. Additional locking screws are available for pilots who prefer extra security during aggressive flying or transport.
FPV Integration and External Hatch 📡
Soar Stick supports an optional external FPV hatch that keeps airflow clean and installation simple. Cameras, transmitters, and antennas can be mounted externally while routing cables neatly into the fuselage.
The design supports multiple antenna configurations and allows camera position adjustments. Using a folding propeller results in a clean FPV view once the motor is stopped, enhancing the soaring experience.
Printing Philosophy and 3MF Project Files 🖨️
Soar Stick is distributed using 3MF project files instead of pre-sliced G-code. This approach allows users to slice the model with their own printer and filament profiles while preserving correct part-specific settings.
Project files are compatible with popular slicers and provide a consistent starting point across different hardware setups.
Critical Slicer Settings ⚠️
Certain slicer settings must be followed for reliable results. Line width should be consistent everywhere. Gap closing must be disabled. The classic wall generator and even-odd slicing mode are required. Supports are not used.
These parameters ensure structural integrity, correct weight, and predictable strength.
Recommended Printing Speeds
For standard-size models, higher print speeds are supported while maintaining quality. Layer height, nozzle diameter, and line width are defined to balance strength and print time.
For scaled versions, adjusted speeds and flow values are recommended to preserve structural behavior at larger sizes.
First Print Verification
The recommended workflow begins with printing the largest part first. This allows early verification of layer adhesion, surface quality, and final weight.
Each model includes a dedicated settings table. A small weight difference of one to two grams is acceptable, but larger deviations usually indicate incorrect slicer settings.
Flow Calibration
If printed weight does not match expectations after verifying all settings, minor flow adjustment is recommended. Small corrections are often enough to close the gap caused by filament variation or extrusion inconsistency.
Adjustments can be made either in the slicer or directly on the printer, depending on whether you want the estimated weight to change.
Closing Notes 🌤️
Soar Stick is designed to reward patience and careful assembly. Taking time during hinge installation, verifying free movement at every step, and validating print weights early will result in a reliable, long-lasting soaring glider.
This platform is meant to grow with you. Start simple, enjoy calm soaring flights, and explore deeper soaring techniques as your confidence builds.
